 |
| 
Add multilingual support to Windows Setup
To support multiple languages with Windows Setup:
- Add languages to the Windows Setup image (boot.wim index:2) to install Windows images through Windows Setup
- When you add languages to a Windows image (install.wim), add a list of languages (lang.ini) so that during installation you can select which language is installed as the default language.
Step 1. Copy installation files to a working folder
md C:\my_distribution
xcopy /E D: C:\my_distribution
where D: is location of the Windows installation media
Step 2. Add languages to the default Windows Setup boot image (index:2)
1. Click Start, and type deployment. Right-click Deployment and Imaging Tools Environment and then select Run as administrator.
2. Mount the second image (index 2) in Boot.wim.
md C:\mount\boot
Dism /mount-image /imagefile:C:\my_distribution\sources\boot.wim /index:2 /mountdir:C:\Mount\boot
3. Add language packs from the Windows ADK into your mounted image using Dism /Add-Package for each language you want to support. Add lp.cab, WinPE-setup_<language>.cab. For Windows 10, also add WinPE-Setup-client_<language>.cab. For Windows Server, also add WinPE-Setup-server_<language>.cab
Windows PE language packs are available in the Windows ADK.
For Windows 10
Add multilingual support to Windows Distribution
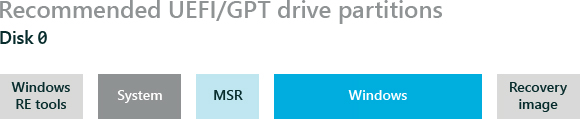
Configuring Disk Partitions
list disk
select disk x (where x your disk number 0,1,2,3,... and so on)
clean (This will format the whole disk)
convert gpt
create partition primary size=350
format quick fs=ntfs label="Windows RE Tools"
assign letter="T"
set id="de94bba4-06d1-4d40-a16a-bfd50179d6ac"
gpt attributes=0x8000000000000001
create partition efi size=100
** NOTE: For Advanced Format 4Kn drives, change this value to size = 260 **
format quick fs=fat32 label="System"
assign letter="S"
create partition msr size=128
create partition primary size=256000
** NOTE: I've given 250GB Disk space to the drive where windows will be installed, change this value according to your disk size **
format quick fs=ntfs label="Windows"
assign letter="W"
create partition primary size=4096
format quick fs=ntfs label="Recovery Image"
assign letter="R"
set id="de94bba4-06d1-4d40-a16a-bfd50179d6ac"
gpt attributes=0x8000000000000001
**NOTE: I've a 500GB External hard disk and partitioned it accordingly. After this I get an unallocated disk space roughly say 245 GB which I can create a partition here using "create partition primary" or later after Windows installation using Disk Management. **
list volume
exit
Applying Windows, System, and Recovery Partitions by using Deployment Image Servicing and Management(DISM) Tool
md R:\RecoveryImage
copy C:\sources\install.wim R:\RecoveryImage\install.wim
cd X:\Windows\System32
dism /Apply-Image /ImageFile:R:\RecoveryImage\install.wim /Index:1 /ApplyDir:W:\
md T:\Recovery\WindowsRE
copy W:\Windows\System32\Recovery\winre.wim T:\Recovery\WindowsRE\winre.wim
bcdboot W:\Windows /s S: /f UEFI
W:\Windows\System32\reagentc /setosimage /path R:\RecoverImage /target W:\Windows /index 1
W:\Windows\System32\reagentc /setreimage /path T:\Recovery\WindowsRE /target W:\Windows
.